Microsoft Azure is an advanced set of cloud computing services that hosts existing applications, streamline the development of new applications,and also enhances on premises applications. It provides assistance in the whole process of testing, deploying and managing applications and services.
When deployment of infrastructure-as-code to Azure is required, the most effective and simple way of doing it is Azure Resource Manager (ARM) templates. It define the objects required as well as types, names, properties in JSON format which can be recognized by ARM API.
Defining ARM And ARM templates
Azure is managed by API. Originally it was managed using the Azure Service Management API which was replaced AZURE Resource Manager(ARM API). There are certain objects in AZURE which ARM manages such as virtual machines, network cards.
Benefits of Azure ARM Templates:
- Deploy multiple resources through a single unit: User can combine different kind of resources declaring their name and properties and deploy via a single unit.
- Redeploy same template: User can deploy same template multiple times for different environments as per the requirement.
- Export Template From Existing Resource: Facilitates the user to export template from existing resource and deploy further when required.
In a nutshell, building both Azure VM with ARM templates comprises of two rough steps: building a JSON template file and executing the New-AzureRmResourceGroupDeployment cmdlet, which then facilitates in reading all of the logic inside this JSON template file to feed the Azure API parameters.
Methods Of Deploying AZURE Templates:
- Using GITHUB
- Using Azure Portal
- Using Azure PowerShell
- Using Azure CLI
Using GITHUB:
Once the user configures the ARM template it can be deployed through GitHub and users can develop, test and publish templates for other’s use
Firstly, Templates can be viewed clicking in this url: https://github.com/Azure/azure-quickstart-templates
Clicking on the template will traverse the user to below window:

Exploring ARM Template:
- Deploy to Azure button: Clicking on this button will redirect to AZURE portal in which user can login using relevant credentials.
- Visualize Button: This makes visible to the user how the resources are linked and also makes visualize template architecture.
Following that, clicking the deploy To Azure button will traverse to Azure portal where user can log into the below:

All the required details need to be filled there like admin username and password
-adminUsername $(vmuser) -adminPassword (ConvertTo-SecureString -String $(vmpassword) -AsPlainText -Force) -dnsNameForPublicIP $(dns)'
Afterwards one can view the progress of deployment and once the VM gets deployed under VMdeployment
Using AZURE Portal:
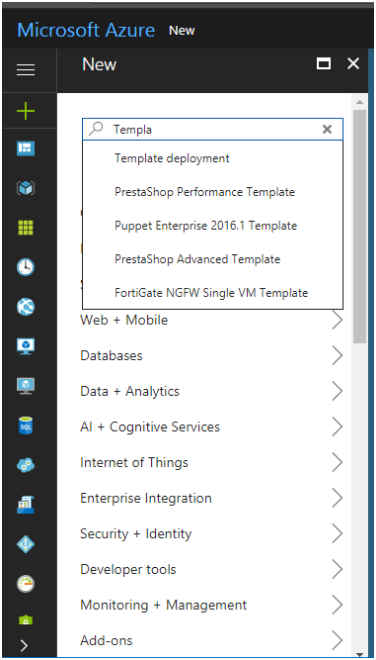
Firstly, user will have to sign in to portal https://portal.azure.com with respective credentials and have to search for template deployment
Secondly, for creating the custom template the user has to click on create button
Third, User will add resource clicking on resource button and have to select windows VM . A new template will be created including all the details name of resource, virtual network name.
New resource details will be updated and if required user can modify the details clicking on Edit Template button. Once completion of all the parameter details, purchase will be clicked and VM will be launched.
Using PowerShell:
Now we will use PowerShell to deploy this new ARM template to create our VM.
Before undergoing the said method, Powershell should be configured for AZURE stack HUB user.
Below steps are mentioned for the same:
- User will browse AzureStack-QuickStart-Templates repo and find the 101-simple-windows-vm template. The template should be saved to this. Location: C:\templates\azuredeploy-101-simple-windows-vm.json.
- User will open an elevated PowerShell command prompt.
- Thirdly, user should replace username and password in the following script with previously defined name and password, then run the script:
# Set deployment variables
$myNum = “001” # Modify this per deployment
$RGName = “myRG$myNum”
$myLocation = “yourregion” # local for the ASDK
# Create resource group for template deployment
New-AzureRmResourceGroup -Name $RGName -Location $myLocation
# Deploy simple IaaS template
New-AzureRmResourceGroupDeployment `
-Name myDeployment$myNum `
-ResourceGroupName $RGName `
-TemplateUri<path>\AzureStack-QuickStart-Templates\101-vm-windows-create\azuredeploy.json `
-AdminUsername<username> `
-AdminPassword (“<password>” | ConvertTo-SecureString -AsPlainText -Force)
The user have to provide appropriate details like ResourceGroupName, location and path of JSON file to deploy template. Once the above steps are finished, a status will be popped up in screen which will reflect as:
ProvisioningState has been succeeded.
Using Azure CLI:
After Logging in with Azure Subscription,
For configuring a storage account:
az group create --name resourcegroupname --location "East US"
az group deployment create --resource-group resourcegroupname --template-file JSONFilePath