Every database administrator or system administrator has to perform backup and recovery and almost all of them have performed backups and restores if not an entire recovery in their career. So, it is very important to have complete knowledge and clarity about the procedure for performing the different types of backups and restores in Microsoft SQL Server using the command line and SSMS GUI and the different options available and when to use which option and which options go together and which do not. This article will take you through that process for the different types of backups an restores.
- Full Backup– A Full backup is the most common, simplest, useful and first backup to in a backup set. The generic T-SQL command to take a full backup of a database is the following.
| BACKUP DATABASE [database_name] TO <backup_device> = [backup_file_path\backup_file_name.bak] WITH <general_options>; |
In above syntax,
| ▸ BACKUP DATABASE – command which tells SQL Server to do a full backup of the database. |
| ▸ database_name– the logical name of the database being backup up. |
| ▸ TO – keyword used to specify the database destination i.e. in which media and where in the media. |
| ▸ backup_device– indicates the type of the backup media. The possible values are DISK, TAPE and URL. |
| ▸ backup_file_path– complete path to the existing datafile file or the new file that will be created with the specified name. |
| ▸ backup_file_name– the logical name of the existing or new backup file that will be created. The file should have a .bak extension. |
| ▸WITH –keyword used to specify additional options. |
| ▸general_options–used to specify optional options which control different aspects of the backup process. The important and most relevant among them are the following. |
| COMPRESSION – compresses the database backup to save space in the storage medium. The default is to not compress the backup. |
| CHECKSUM – generates a checksum on the entire database to ensure its correctness and consistency. The default is to not generate any checksum. |
| ENCRYPTION – encrypts the database with the encryption algorithm specified. It takes a number of parameters including the encryption algorithm type, server certificate and server key. |
| EXPIREDATE – date and time when the backup expires. |
| RETAINDAYS – number of days to retain the backup or the number of days for which it is valid for restoration. |
| BLOCKSIZE – specifies the block size to be used in the storage medium. Default is 64 KB for tape drives and 512 KB for magnetic disks. It is mostly an unnecessary option as SQL Server takes the defaults automatically. The only scenario where it requires specification is if you are backing up to CD/DVD in which case you have specify a block size of 2014 KB manually. |
| BUFFERSIZE – tells SQL Server how many buffers it should use in memory for the backup process. |
| MAXTRANSFERSIZE – tells SQL server what is the maximum number of bytes it can transfer to the media at a time. The values have to be specified in multiples of 64 KB and can range from 64 KB to 4 MB max. |
| STATS – displays backup status or progress. It takes integer values. Like for example 25 will show progress after every 25%. |
| INIT|NOINIT – The INIT option creates a new backup file in the backup set and NOINIT appends to the existing backup set. Default is to append i.e. NOINIT. |
| SKIP|NOSKIP – SKIP does not check the backup set name and expiry datetime while NOSKIP checks the same before overwriting the backup set. Default is NOSKIP. |
| FORMAT|NOFORMAT – format formats the backup media by removing the media header while no format does not make any change to the backup media. |
| STOP_ON_ERROR – stops the backup process if it encounters a torn page error or checksum error. Either of the two feature has to be enabled for the database in the database properties for the option to be used. |
| REWIND|NOREWIND – applies only to tape backup. REWIND rewinds the tape after the backup and NOREWIND does not. |
| UNLOAD/NOUNLOAD – applies only to tape backup. UNLOAD ejects the tape from the tape device after the backup and NOUNLOAD does not. |
Practical example
Let us consider that we have a database called bookstore in our SQL Server.We can write the above full backup command using the bookstore database and some of the general options specified above as below.
Full backup using T-SQL from SQL command prompt
| BACKUP DATABASE bookstore TO DISK = ‘D:\bookstore_backups\bookstore.bak’ WITH COMPRESSION, CHECKSUM, RETAINDAYS=25, STOP-ON_ERROR, STATS = 25; |
Full backup from SQL Server Management Studio (SSMS) GUI
- Open SSMS and right click on the chosen database and navigate to Tasks -> Backup as shown below.

- It will open the backup dialog where you can see all the options. In Database you can change the pre-selected database to another database. You can change the Destination to tape or URL if applicable. To get the tape option the system should have access to a tape device. You can change the default backup path of C:\Program Files\Microsoft SQL Server\MSSQL15.MSSQLSERVER\MSSQL\Backup\ to your desired path in the storage media.

- In the Media Options tab, you have the data write options.Append to existing backup set corresponds to NOINIT. Overwrite all existing backups correspond to INIT. Check media set name and backup set expiration corresponds to NOSKIP. Reliability option Perform checksum before writing to mediacorresponds to CHECKSUM. Continue on error corresponds to CONTINUE_ON_ERROR.

- In the Backup Options tab, Afterwith Backup set will expire is the REATINDAYS option. On is the EXPIREDATE option. Set backup compression is the COMPRESSION option which allows you to tell the server whether or not the backup should be compressed. At the bottom is the Encryption option which is only available when you start a new backup schedule with a new media.

- After making all the selections as per your requirement click OK and the backup will be done. Please is a screenshot of the bookstore database in the default SQL Server backup path.

- Differential Backup – A Differential backup backs up the database with respect to the last full back up using that as the differential base. The T-SQL command to perform a Differential backup is exactly the same as the command for full backup except for the fact that we have to specify DIFFERENTIAL with the WITH option as below. Everything else is the same and all the keywords and general options described above are applicable for differential backup also. Another important thing is that the differential file backup file extension should be .dif.
| BACKUP DATABASE [database_name] TO <backup_device> = [backup_file_path\backup_file_name.dif] WITH DIFFERENTIAL,<general_options>; ; |
Practical example
Following is a practical representation using the bookstore database and some of the general options.
Differential backup using T-SQL from SQL command prompt
| BACKUP DATABASE bookstore TO DISK = ‘D:\bookstore_backups\bookstore.dif’ WITH DIFFERENTIAL, COMPRESSION, CHECKSUM, RETAINDAYS=25, STOP_ON_ERROR, STATS 25; |
Differential backup from SQL Server Management Studio (SSMS) GUI
- To do a differential backup you have to select the Differentialoption for Backup type. Rest is same. Please note that the copy-only option is greyed out since you cannot do a copy-only differential backup.

- File Backup – A File backup backs up one or more data files in the database. The T-SQL command to perform a File backup is also the same as that for a full backup but uses the FILE keyword to specify the name of the data file to be backed up.The backup file should have a .fil extension.
| BACKUP DATABASE [database_name] FILE [file_name] TO <backup_device>= [backup_file_path\backup_file_name.fil] WITH DIFFERENTIAL,<general_options>; |
File backup from SQL Server Management Studio (SSMS) GUI
- To do a file backup, we need to have additional data or log files in the database. We can create one by right clicking on the database and selecting Propertiesas shown below.

- This will open the Database Properties dialog. In the dialog, go to the Files tab and click the Add button below to add a data (corresponds to the ROW DATA option), log (corresponds to the LOG option )or filestream file. The below screenshot shows the same.

- I have given it the name test_data_file. After typing the name click OK and the file will be created. Now we can do a file backup.

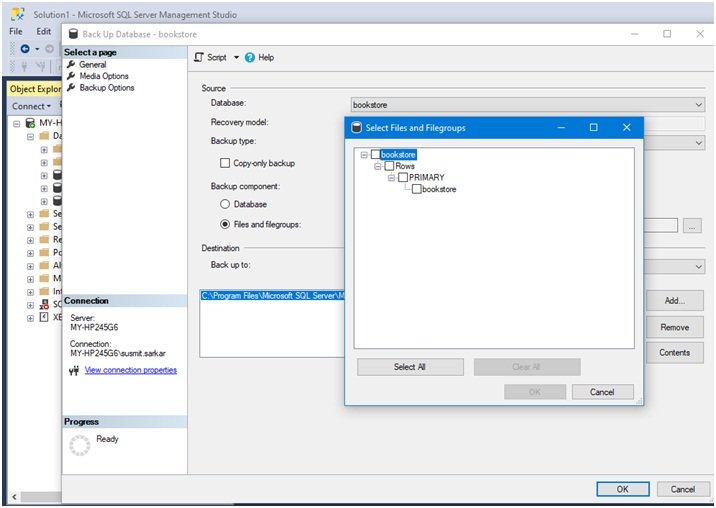
- To do a File backup follow the usual steps to backup and in the ‘Back Up Database’ dialog select File and filegroups in Backup component. That will pop up the file select box where you can select the file you want to backup. The below figure shows the same.

- Once you are done click OK on all the boxes and the File backup will be done.
- FileGroup Backup – A File Group backup backs up the primary file group or any additionally defined file group in the database. The T-SQL command is the same as above but uses the FILEGROUP keyword to specify the name of the file group to be backed up. The backup file should have a .flg extension.
| BACKUP DATABASE [database_name] FILEGROUP [file_group_name] TO <backup_device>= [backup_file_path\backup_file_name.flg] WITH DIFFERENTIAL,<general_options>; |
File group backup from SQL Server Management Studio (SSMS) GUI
- To do a File group backup, you have to click on the Files and filegroup radio button which will expose the filegroups from which you have to make a selection. The below figure shows only the PRIMARY filegroup since it is a test database which does not have any additional file groups configured.
- After clicking and selecting PRIMARY it will show up in the main backup dialog against Files and filegroups. You can make additional selections for other aspects of the backup if required and click on OK and the backup will be done.

- Below screenshot shows how to add an additional filegroup. You have to go to the Files tab of Database Properties dialog and click Add. While adding select <new filegroup> and click OK and it will bring up the File group naming dialog.

- In the File group naming dialog type in the name. You also have the option of making it Read Only if you want. Once you are done click ok and the new File group will be created and can be included in future backups.

- Transaction log Backup – A Transaction log back up does not back up any of the data files in a database but only the transaction logs to facilitate log replay and page recovery. It has a .trn file extension. The command to take a transaction log backup is the following.
| BACKUP LOG [database_name] TO <backup_device>= [backup_file_path\backup_file_name.trn] WITH <general_options>,<log_specific_options>; |
In above syntax,
| ▸ BACKUP LOG – command which tells SQL server to do a transaction log backup only. |
| ▸ log_specific_options– These are options apart from general options which apply only to transaction log backups and include the below. |
| NORECOVERY – put the database in restore mode after the transaction log backup. |
| NO_TRUNCATE – does not truncate the transaction log after backup i.e. does not empty and refresh the transaction log. |
| CONTINUE_AFTER_ERROR – ignores torn page or checksum errors encountered during the backup process and continues irrespective of them. Either of the two feature has to be enabled for the database in the database properties for the option to be used. |
Transaction Log backup from SQL Server Management Studio (SSMS) GUI
- To do a Transaction log backup select Transaction Log in Backup Typeas shown below and SQL Server will do a Transaction log backup.

- Additionally, you can see the Truncate the transaction log radio button which is preselected. This is because the SQL Server is in Full Recovery mode and the option cannot be disabled.

- Copy-Only Backup – A Copy-Only backup allows us to do an ad-hoc full backup of the database or transaction log. The T-SQL command to take a copy-only backup of the database and transaction log are the following. The only difference in the command is that we have to specify COPY_ONLY with the WITH option to tell SQL Server that we want to do a Copy-Only full backup and not a n full normal full backup.
For copy-only database backup
| BACKUP DATABASE [database_name] TO <backup_device>= [backup_file_path\backup_file_name.bak] WITH COPY_ONLY,<general_options>; |
For copy-only transaction log backup
| BACKUP LOG [database_name] TO <backup_device>= [backup_file_path\backup_file_name.bak] WITH COPY_ONLY,<general_options>; |
Copy-only backup from SQL Server Management Studio (SSMS) GUI
- Select Copy-only backup in Backup Type to do a Copy-only backup. The first screenshot below shows a Copy-only backup of Transaction Logs.

- Tail Log Backup– The tail log backup does a full backup of the tail of the transaction log which basically means that it backs up records from the log which have not been backed up by the last transaction log backup. Performing a Tail Log backup is essentially the same as performing a Transaction log. There is no difference in the process and T-SQL command and the log specific options apply as well. The command is the following.
| BACKUP LOG [database_name] TO <backup_device>= [backup_file_path\backup_file_name.trn] WITH <general_options>,<log_specific_options>; |
Tail log backup from SQL Server Management Studio (SSMS) GUI
- To do a tail log backup select the Backup Type as Transaction Log as shown above. Then in Media Optionstab, select the option Backup the tail of the log, and leave the database in a restoring state. The leave the database in a restoring state corresponds to NORECOVERY.Additionally, you can also select the Continue on error to ensure that the backup happens in spite of torn pages and checksum errors. The below screenshot shows the same.

With that we come to the end of the article. Hope this will make the backup process clearer and you will be less guessing and more confident you are backing up the database next time.