In this article we will discuss the different types of restores that can be performed in Microsoft SQL Server. But before doing that we need to get a few things out of the way to ensure that we do not suffer from doubt or self-doubt when we are doing a restore. These include having an understanding and clear idea about backup sets and recovery models. Below is a description of both.
- BackupSet – A backup set can be a set of multiple backup file or a single backup file containing many backups. If it is multiple files then it is easy to identify the different files from their names, timestamps and file extensions as to which is which. But if all the backup is in a single file then we need to be able to identify the different backups in the file and their order (i.e. which follows which to be able to restore in the correct order). The same can be done with the help of the following command.
- Recovery Model – There are 3 different recovery models and every Microsoft SQL Server is set to one of these recovery models. This is important to know because you cannot do a transaction log, tail log or page restore if the SQL server is set in the Simple Recovery Model. As a general rule, the recovery model is almost always set to FULL in every organization as it allows the most complete point in time restoration.
The recovery model can be checked from the T-SQL command line by querying sys.databasesas shown below.
| SELECT name, recovery_model_desc FROM sys.databases WHERE name = ‘model’; |
It will show the following output.
| name | recovery_model_desc |
| model | FULL |
The recovery model can be set to a particular model if required (usually required when configuring a new SQL Server installation or if the organization changes its backup policy) from the T-SQL command line using the following ALTER command. The <model_name>can be any of the models i.e. FULL, SIMPLE or BULK-LOGGED. After making the change you can verify it running the command specified above to check the recovery model.
| ALTER DATABASE database_name SET RECOVERY<model_name>; |
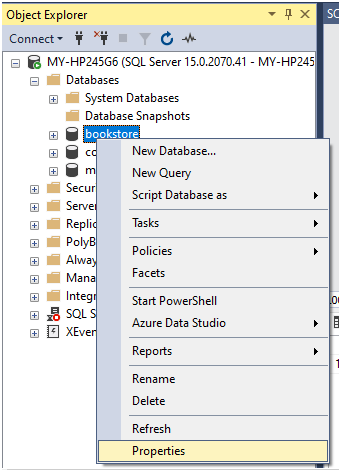
The above checking and setting can also be done very easily from the SSMS GUI. Right click the relevant database and click on Properties.
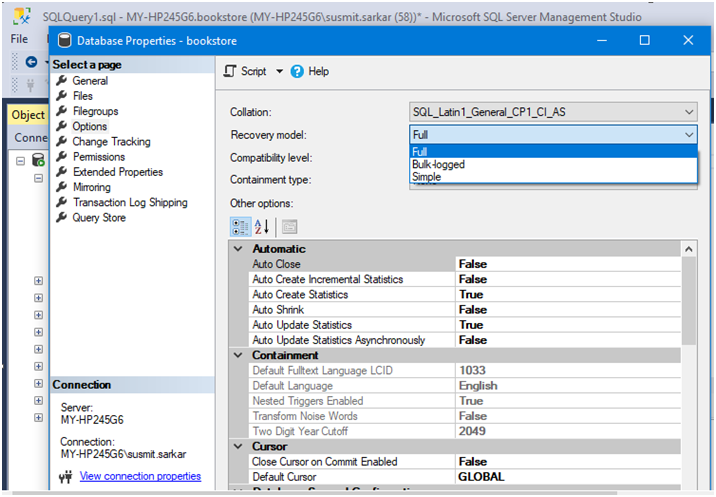
In the Options tab of the Database Properties dialog box you have the option to check and set the Recovery model of the database. To set the recovery model select the model you want and click OK to register the change.
- Database status – A database status is ONLINE when it running and processing data and OFFLINE when it is not. SQL Server supports both online and offline restoration of database. However online restoration is only supported in SQL Server Enterprise. So, if your SQL server does not permit online restoration you have to take it offline with the following command.
| ALTER DATABASE database_name SET OFFLINE; |
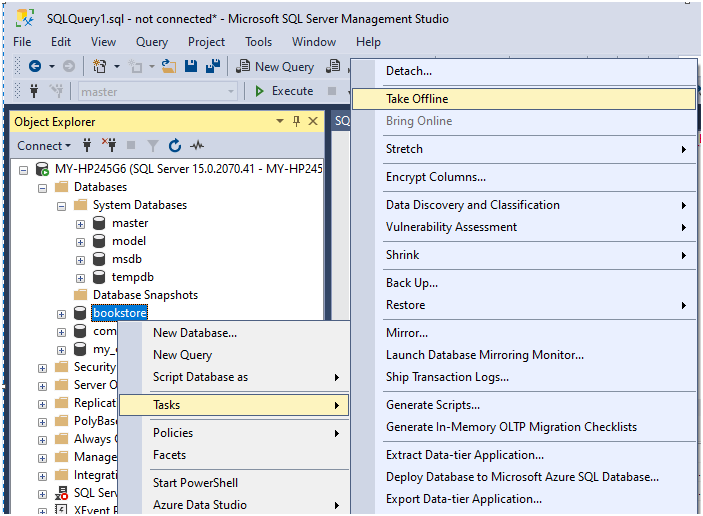
It can also be done from the SSMS GUI by right clicking the database and selecting ‘Take Offline’ as show in the following figure.
THE DIFFERENT TYPES OF RESTORE OPERATIONS
With the above understanding we can now proceed to the different types of restore operations that can be performed and the different types of backups that can be restored and when to do which and how. Broadly speaking there are 3 different types of restores in Microsoft SQL Server. They are Database restore, File and Filegroup restore and Page restore. We will go through them one by one and understand all of them.
- Database restore – A database restore is the process of restoring a database or the transaction log of a database which has crashed or become corrupted for one or another reason. A restore operation might be a one-step process if you are restoring from the single last Full backup or it might be a multi-step process if you are restoring from a backup set consisting of multiple backup files or a single file containing multiple backups. There is also the scenario of restoring an already existing database in the SQL server or moving the database to another SQL server where the database being restored does not exist. The process for each is different and has to be followed meticulously if the restore has to succeed. We will take them up one by one.
- Performing a final restore – This is the simplest scenario where you are restoring from a single full or copy-only backup or from the final differential backup or transaction log backup to complete the restoration process after which you will bring the database online. The T-SQL command to do the same is the following. The WITH RECOVERY completes the restore process and makes the database ready for use. The REPLACE options overwrites the existing database file.
| RESTORE DATABASE database_name FROM DISK = ‘backup_path\backup_file’ WITH RECOVERY, REPLACE; |
If all your backups are in a single file then you will need to find out which is the last backup in the series to complete the restoration and bring the database online. You can find out information about all the backups and their order in the backup set by the position number so that you can identify and restore the backups in correct order till the last backup with the below T-SQL command. The backup with the highest position number will be the last and final backup to restore. Suppose there are 10 backups in the set then the final backup will be the one with position number 10.
| RESTORE HEADERONLY FROM DISK = ‘backup_path\backup_file’; |
Once you locate the last backup by its position number you have to specify the same in the command line as below to do the restore. In fact, you have to specify the position number for every backup you are restoring from a backup set contained in a single backup file. The X in the below command will be an integer value specifying the backup file position number. For example, it will be 10 if it is the final backup from a set of 10 backups.
| RESTORE DATABASE database_name FROM DISK = ‘backup_path\backup_file’ WITH FILE = X, RECOVERY, REPLACE; |
- Performing an intermediate restore – The T-SQL command to perform an intermediate restore is the same as above with one additional option. The additional option is the NORECOVERY option which is toll tell SQL Server that the restore operation is not complete so that SQL Server keeps the database in restore mode and further restores can be performed before the restoration process is complete and the database can be made online.
| RESTORE DATABASE database_name FROM DISK = ‘backup_path\backup_file’ WITH NORECOVERY, REPLACE; |
For a backup set with a single file containing multiple backups in it you will need to incorporate the file position of the intermediate backup file being restored as described above and shown below.
| RESTORE DATABASE database_name FROM DISK = ‘backup_path\backup_file’ WITH FILE =X,NORECOVERY, REPLACE; |
- Moving a database into another SQL Server – If you are restoring the database from backup into another SQL server where the database does not exist, the T-SQL command will include an additional option of MOVE. The MOVE option will move the data file and the log file (suffixed _LOG) from the backup to a custom path you specify to house the files in the new server or the usual SQL server database path (C:\Program Files\Microsoft SQL Server\MSSQL15.MSSQLSERVER\MSSQL\DATA\) where databases and their log files are housed.The command is do the restore is below.
| RESTORE DATABASE database_name FROM DISK = ‘backup_path\backup_file’ WITH MOVE ‘database_name’ TO ‘database_path\database_name.mdf’, MOVE ‘database_name_log’ TO ‘database_path\database_name.ldf’ |
You can check the data and log files in a database backup for confirmation before specifying them in the above command using the below command.
| RESTORE FILELISTONLY FROM DISK = ‘backup_path\backup_file.bak’; |
It will display the following output listing the data and log file in the backup file.

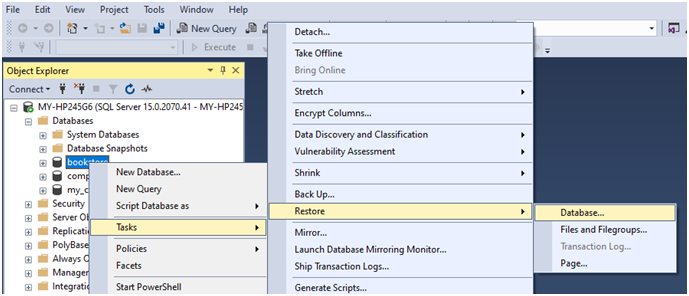
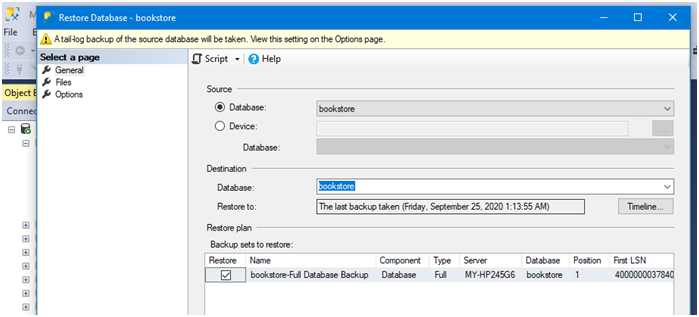
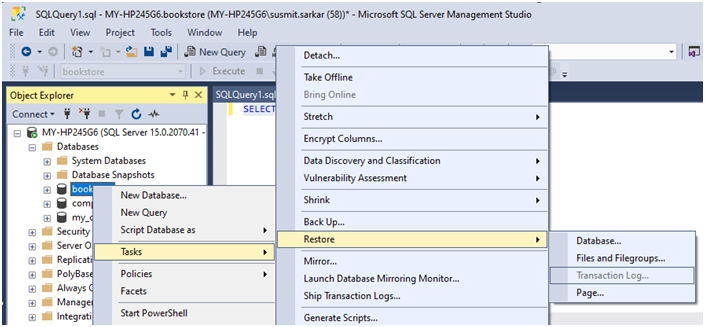
All the above mentioned can be done much more easily in SSMS. Open SSMS. Right click in the relevant database which you want to restore and select Database as shown below.
Now let us visit each of the tabs in the Restore Database window and check out all the different options and their corresponding command options which we have discussed so far. In the General Page we can leave the preselected Database or select the Device radio button and then select the specific backup that we want to restore. On selecting the backup set it will identify the database and the restore point. You can also use the Timeline button to select a date and time and the system will look for and find the corresponding backup for it if it exists and use it for the restore.
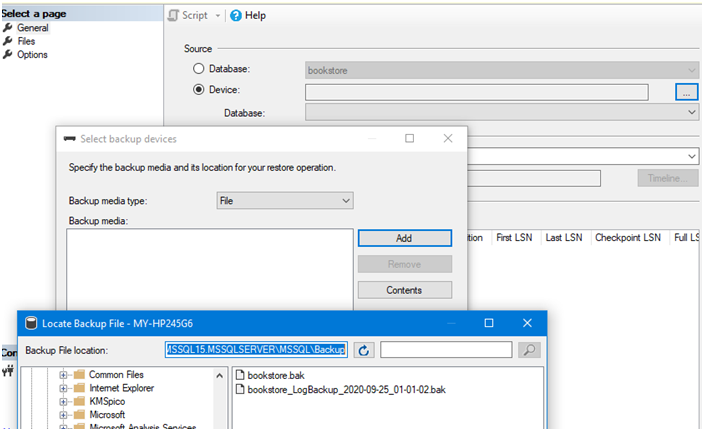
The device dialog is as below which lets you select the Backup media type and add the file from the file dialog box.
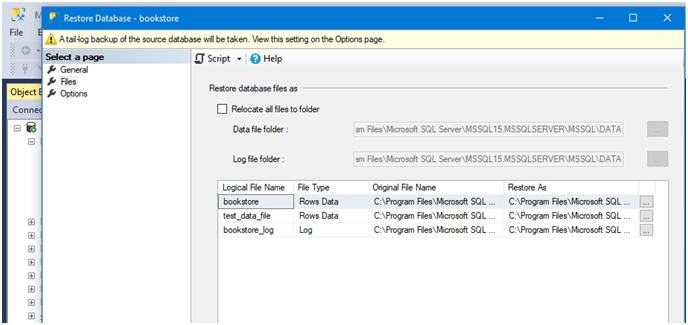
Next, we go to the Files tab. In the files tab,if we leave it as such then the database will be restored from the backup to the preselected default location. If we select the Relocate all files to folder then it will put the data and log files from the database restore to the new path we specify.
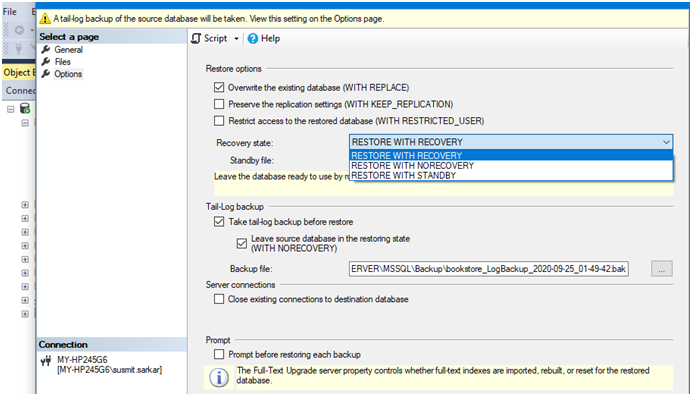
Finally, we go to the Options tab. The first option is Overwrite the existing database (WITH REPLACE). It should not be selected for a move to another server. It should be selected to restore an existing broken database. The second option Preserve the replication settings (WITH KEEP_REPLICATION) is only applicable if the database being restored is a published database which is replicated. In Recovery state for a final restore choose RESTORE WITH RECOVERY, for an intermediate recovery choose RESTORE WITH NORECOVERY or RESTORE WITH STANDBY. If you want to take a tail log backup before running the restore select the Tail log backup before restore checkbox. Select the Close existing connections to destination database if you are doing an offline restore. If you want to be prompted for every file that is restored from the backup set or every backup that is restored from the single backup file holding all the backups select the Prompt before restoring each backup. Once you have made all selections depending on the type of database restore you are performing click OK to run the restore.
- Fileand File Group Restore –A File or File Group restoration is a piecemeal restore. It restores a single file or the files in a file group of a database. Usually there is only a single file group called the PRIMARY_GROUP in every database. The T-SQL command to restore a filegroup is the following.
| RESTORE DATABASE database_name FILEGROUP = ‘filegroup_name’ FROM DISK = ‘backup_path\backup_file.bak’ WITH PARTIAL, NORECOVERY, REPLACE; |
The command to restore a file from a filegroup is the following. It is possible to restore one or more files.
| RESTORE DATABASE database_name FILE = ‘fileX’, FILEGROUP = ‘filegroupX’, FILE = ‘fileY’, FILEGROUP = ‘filegroupY’ FROM ‘backup_path\backup_file.bak’ WITH NORECOVERY,REPLACE; |
After the restore we can check the status of all files and file groups in the database and whether the relevant files have been restored using the below command.
| SELECT name AS FilegroupName, state_desc AS RecoveryStatus FROM FilegroupRestores.sys.database_files; |
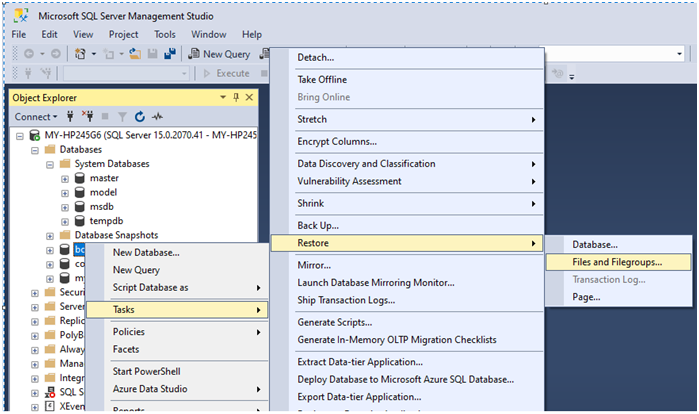
The above can be performed more easily in SSMS. Right click on the relevant database and select Files and Filegroups from Backup.
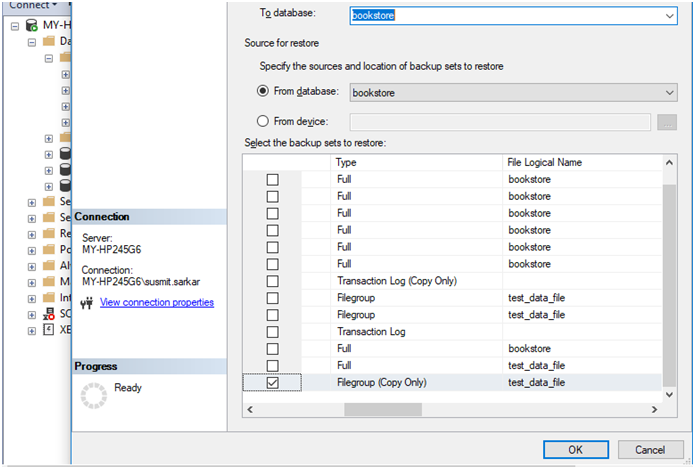
In the Restore Files and Filegroups dialog you can select the backup file from the list of backup sets listed under the Select the backup sets to restore as shown below.
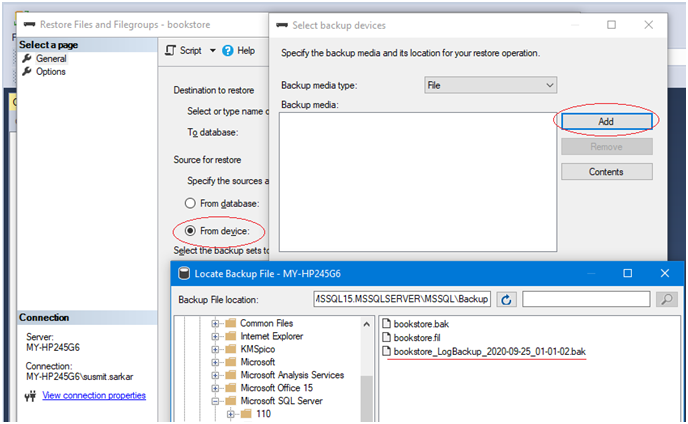
Otherwise you can select the From Device option and then select the particular File or Filegroup backup from the backup path as shown below. Make sure that you enable All Filesin the file dialog to see the FIL or FLG files for restoration.
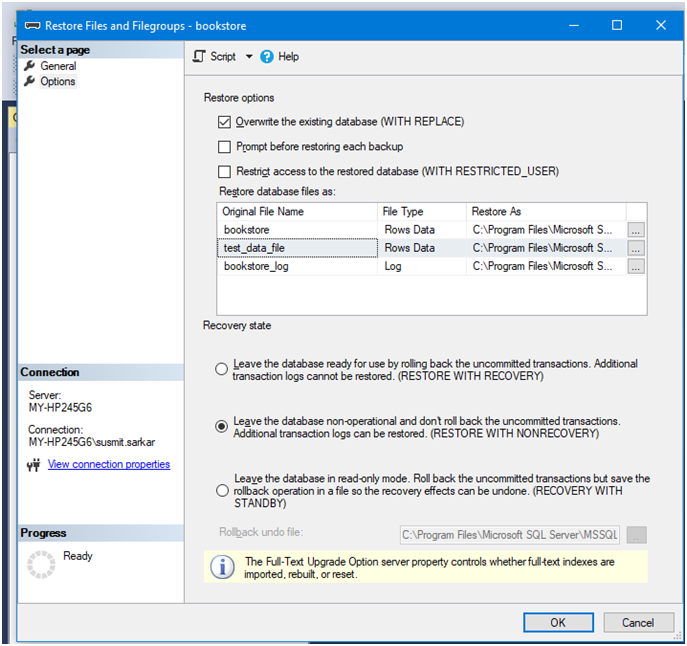
Lastly, we can check the Options page and select the first option and the RESTORE WITH NORECOVERY option and click on OK to run the restore.
- Page Restore – SQL Server data is stored logically in pages and physically in extents. A page is of 8 KB (=8192 bytes). A page in a database might be corrupted due to one or another reason. Page corruption in database data can be identified with the following T-SQL command. If there are corrupt pages the command will list them.
| SELECT * from msdb.dbo.suspect_pages; |
Otherwise you can check the total number of pages in a database using the database consistency checker tool DBCC as shown below. The -1 is to list all data.
| DBCC IND(‘database_name’,’database_table’,-1); |
If I run this command on a demo database called bookstore in my SQL Server it generates the following output showing 2 pages – 312 and 304.

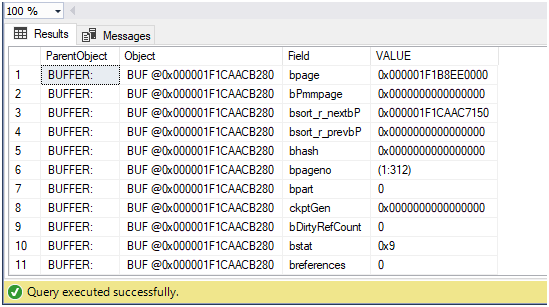
With the page number I can run the below DBCC command to check a page for corruption as below. I have used page 312 of my database bookstore.
| DBCC PAGE(‘bookstore’,1,312,1) WITH TABLERESULTS; |
It produced following output. If there is corruption in the page it will show in Results pane and details in Messages pane.
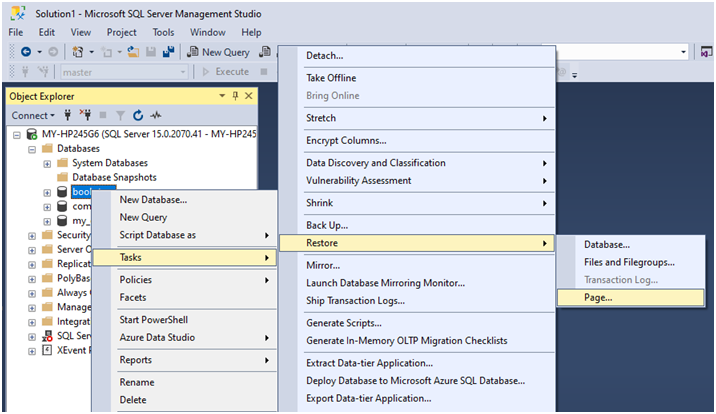
If a corrupt page is identified it can be restored using SSMS with the following steps. Right click the relevant database and select the Page Restore option as shown below.
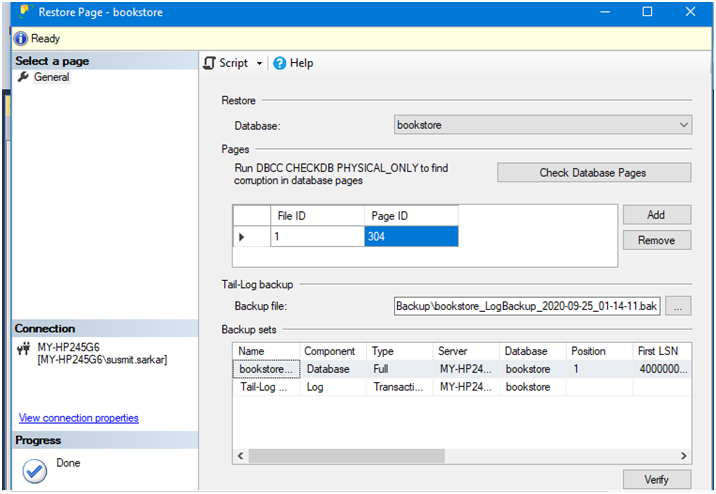
In the Restore page you can type in the details of the page to be restored yourself or you can click on the Check Database Pages button and it will check and retrieve the corrupt pages to restore. Once it is done you can go with the listed backup file or select the correct backup file and then select the backup from the Backup sets and click Verify button to check the consistency of the backup.
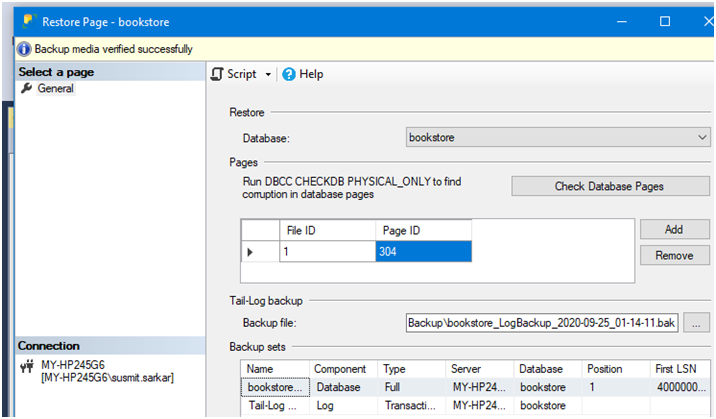
It will show the verification status at the top and if it is successfully verified click on OK to run the restore and it will be done.
- Transaction Log restore – The transaction logs are the last backups to be restored in Full or Bulk Logged recovery model after all the database backups (full and differential) have been restored from the backup set. There might be one or more transaction logs to restore. The T-SQL command to restore a transaction log is the following. Please note that the WITH RECOVERY will go if it is the last transaction log being restored from the backup set. For intermediate transaction log recovery, it will be WITH NORECOVERY. The below command is an example of the former case.
| RESTORE LOG database_name FROM ‘backup_path\backup_file.log’ WITH RECOVERY, REPLACE; |
The same can be done from SSMS GUI by right clicking the relevant database and selecting Transaction Logs. The remaining process of selecting the log backup and overwrite, recovery options are the same as already discussed and displayed above.
That completes our discussion on SQL Server restore. Hope it will stand you in good stead. Now you know all the different restores that can be done with the different backup types and the order of performing a restore and also how to do ad-hoc restore of files, filegroups and pages without restoring the entire database which is easier, safe and sometimes critical.

